
Description
John Danaher – Leglocks: Enter The System
- “Leglocks – Enter The System” from John Danaher: The Most Sought After Grappling Instructor On The Planet
- John helped coach Georges St Pierre and Chris Weidman to UFC World Titles. Garry Tonon has become a 3x ADCC competitor and a grappling Icon
- Leglocks have been called the great equalizer – it doesn’t matter if you are big, strong, fast or flexible; all that you need to apply a successful leglock is the knowledge
- John has guided guys like Eddie Cummings and Gordon Ryan to stardom in a fraction of the time that it would take ordinary people
- This is a curriculum based approach to leg locks
- Enter the system today and change your entire game
Course Content
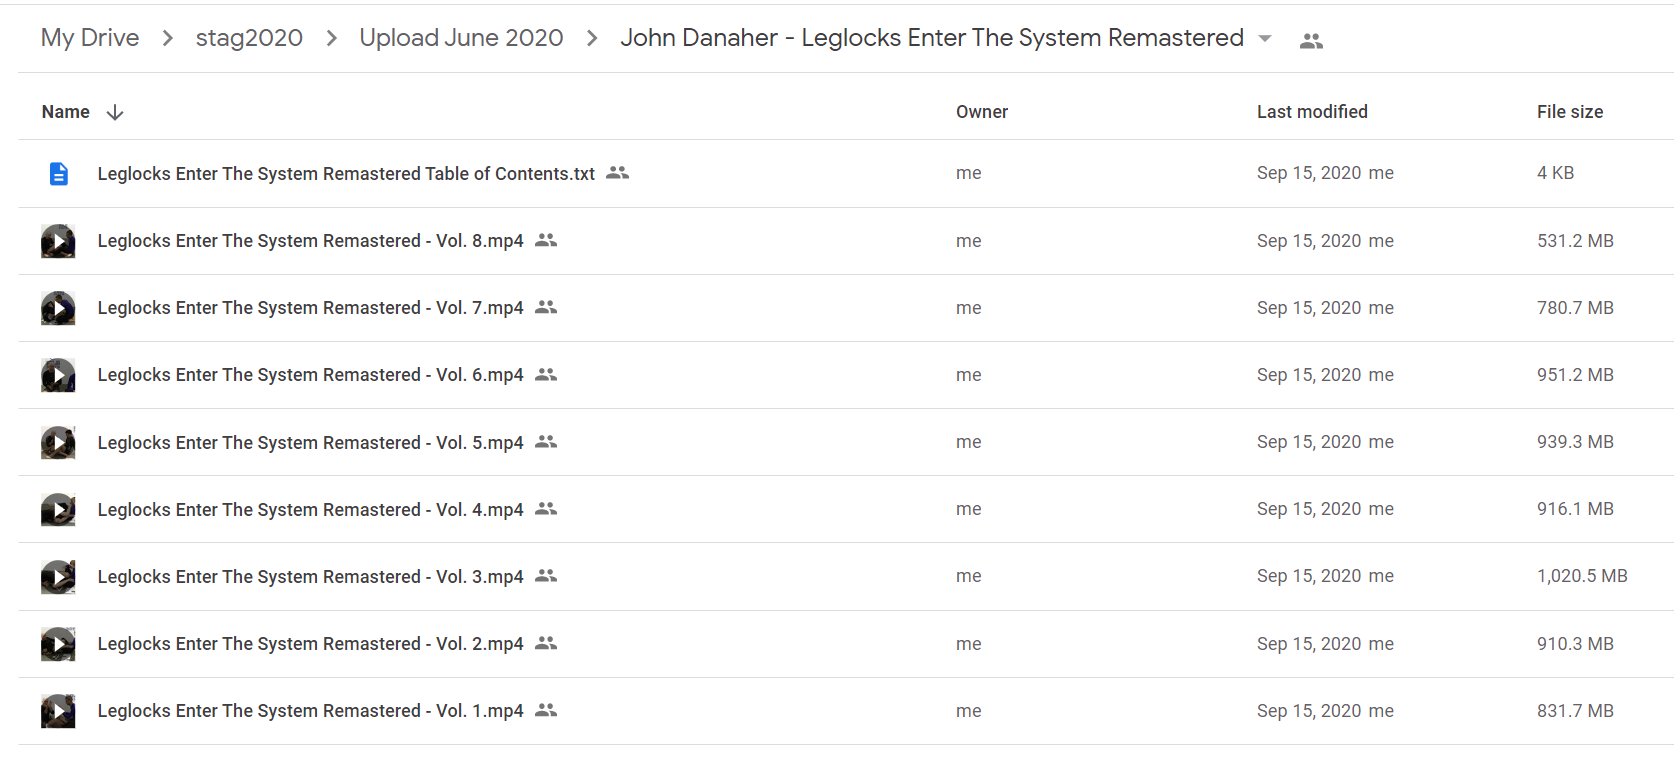
Volume 1
| Introduction | 0 – 1:54 |
| Breakdown | 1:54 – 9:05 |
| Explication | 9:05 – 10:56 |
| Independant Thinking | 10:56 – 12:15 |
| Overview | 12:15 – 15:20 |
| Manifestations of Leg Lock System | 15:20 – 18:41 |
| Grip and Inside Position | 18:41 – 22:38 |
| Gripping | 22:38 – 26:43 |
| 2 on 1 Gripping | 26:43 – 33:25 |
| Immovable Elbow | 33:25 – 39:00 |
| Push Pull Dynamic | 39:00 – 42:38 |
| Torso Controls | 42:38 – 46:22 |
| Hand Over Shoulders | 46:22 – 52:23 |
| 2 on 1 Leg | 52:23 – 56:49 |
| shin To Shin | 56:49 – 1:00:51 |
| Standing Opponent | 1:00:51 – 1:05:33 |
| scoop gripping | 1:05:33 – 1:11:16 |
| Ankle Gripping | 1:11:16 – 1:15:09 |
Volume 2
| Attaining Inside | 0 – 5:00 |
| Standing Opponent | 5:00 – 7:49 |
| De La Riva | 7:49 – 12:17 |
| Pummelling Legs Top Position | 12:17 – 18:40 |
| Movement Inside | 18:40 – 25:07 |
| Supine Opponent | 25:07 – 32:09 |
| Hand Post – Leg Pummeling | 32:09 – 39:53 |
| Irimi Ashi | 39:53 – 48:48 |
| Knee and Knee Line | 48:48 – 53:54 |
| Connection Drills | 53:54 – 58:05 |
| Penetration Drills | 58:05 – 1:04:13 |
| Gravity Drills | 1:04:13 – 1:09:08 |
| Gravity Drills 2 | 1:09:08 – 1:14:20 |
| Gravity Drills 3 Rolling | 1:14:20 – 1:17:43 |
| Recovering Knee Line | 1:17:43 – 1:22:41 |
Volume 3
| Introduction | 0 – 1:43 |
| Single Leg Ashi | 1:43 – 7:07 |
| double Leg Ashi | 7:07 – 10:19 |
| Inside Leg Breakdowns | 10:19 – 16:12 |
| Cross Ashi | 16:12 – 19:03 |
| Introduction | 19:03 – 22:14 |
| Lifting Method | 22:14 – 28:27 |
| Lifting Method Cross Ashi | 28:27 – 30:59 |
| centerline Method | 30:59 – 33:24 |
| Tilting Method | 33:24 – 35:39 |
| negating Resistance Intro | 35:39 – 44:16 |
| General Theory Intro | 44:16 – 45:45 |
| General Theory | 45:45 – 54:05 |
| Follow Through | 54:05 – 59:04 |
| Slack Removal | 59:04 – 1:04:30 |
| Gripping | 1:04:30 – 1:11:25 |
| Outside Heel Hook | 1:11:25 – 1:18:42 |
| Inside Heel Hook | 1:18:42 – 1:25:49 |
Volume 4
| Intro | 0 – 2:26 |
| Shared Spiral Problem | 2:26 – 7:12 |
| Single Ashi Solution | 7:12 – 11:43 |
| Multiple Ashi Solution | 11:43 – 16:14 |
| Exposing The Heel | 16:14 – 19:37 |
| Negating Resistance | 19:37 – 26:52 |
| Breaking | 26:52 – 36:43 |
| Cycles of Inside Outside Dominance | 36:43 – 43:04 |
| Stopping The Spiral | 43:04 – 48:46 |
| CONTROL SPEED OF THE SPIRAL | 48:46 – 1:11:46 |
Volume 5
| introduction | 0 – 14:11 |
| similarities & differences of straight nd cross ashi | 14:11 – 18:04 |
| primary & secondary leg | 18:04 – 19:38 |
| double & single Leg approaches | 19:38 – 21:55 |
| turnout problem | 21:55 – 26:28 |
| double leg approach – ankle lace ashi | 26:28 – 30:18 |
| release problem | 30:18 – 32:09 |
| managing the release | 32:09 – 36:46 |
| alternative achilles grip | 36:46 – 41:38 |
| double heel hook attack | 41:38 – 45:06 |
| lace leg (creating dilemma) | 45:06 – 47:59 |
| splitter hand | 47:59 – 53:50 |
| elbow slicer | 53:50 – 57:17 |
| over under method | 57:17 – 1:02:01 |
| double elbow | 1:02:01 – 1:04:21 |
| double cross method | 1:04:21 – 1:07:46 |
| controlling shared spiral | 1:07:46 – 1:15:47 |
Volume 6
| intro | 0 – 2:21 |
| Central Problems | 2:21 – 4:59 |
| Untying Legs | 4:49 – 10:18 |
| Double Leg Roll | 10:18 – 15:47 |
| Figure Four Toe Hold | 15:47 – 19:26 |
| Dilemma Attack | 19:26 – 26:37 |
| Figure Four toe Hold Primary Leg | 26:37 – 35:06 |
| Figure Four toe Hold Non Optimal Conditions | 35:06 – 42:25 |
| Transition to Outside Ashi Outside Heel Hook | 42:25 – 48:17 |
| Transition to Cross Ashi Inside Heel Hook | 48:17 – 53:22 |
| Intro | 53:22 – 55:00 |
| Head Position | 55:00 – 1:01:10 |
| Opponent Spins Leg Crossover | 1:01:10 – 1:05:46 |
| Static Crossover | 1:05:46 – 1:09:48 |
| Spin Leg To Cross Ashi | 1:09:48 – 1:13:34 |
| Spin Leg To Reverse Ashi | 1:13:34 – 1:16:56 |
| Rolling Transition From straight to Cross Ashi | 1:16:56 – 1:22:27 |
Volume 7
| Sliding Ashi | 0 – 4:58 |
| Colloring Elbow | 4:58 – 8:31 |
| Double Leg Entry | 8:31 – 11:46 |
| Single Leg Entry | 11:46 – 16:07 |
| Front Headlock | 16:07 – 18:25 |
| Arm Drag | 18:25 – 21:32 |
| 4 Point Breakdown | 21:32 – 24:02 |
| Intro Ground position | 24:02 – 28:35 |
| Bottom Single Elevator | 28:35 – 32:57 |
| Crossed Feet Single Elevator | 32:57 – 36:47 |
| Inversion | 36:47 – 41:22 |
| Knee Shield Inversion | 41:22 – 45:39 |
| Knee Shield to X Guard | 45:39 – 49:43 |
| Hook Sweep to Reverse X Guard | 49:43 – 54:32 |
| Arm Drag | 54:32 – 58:07 |
| Collar and Heel Entry | 58:07 – 1:02:17 |
| Shoelace Breakdown | 1:02:17 – 1:07:41 |
Volume 8
| Sitback | 0 – 6:56 |
| Inside Out Entry | 6:56 – 9:50 |
| Outside In Entry | 9:50 – 13:04 |
| Outside Step In | 13:04 – 17:23 |
| Half Guard Entries | 17:23 – 26:58 |
| Kani Basami | 26:58 – 30:24 |
| Double Seated Position | 30:24 – 45:24 |
Proof content


Reviews
There are no reviews yet.